Professional Leak Detection: How Our Technicians Find Hidden Water Leaks
Uncover the top techniques used by experts in leak detection services. Learn how to effectively identify leaks and protect your property today.
Free Estimate

Hidden water leaks happen when pressurized pipes, slabs, or fittings leak without showing obvious signs on the surface. Our goal is simple: locate those leaks accurately and without unnecessary damage so repairs are faster and less expensive. Below we explain the tools and methods we use—acoustic listening, infrared thermography, video pipe inspection, tracer gas, pressure testing, and moisture mapping—how technicians combine them on real jobs, and what homeowner warning signs should prompt a call. Knowing how these approaches work helps you stop structural damage, mold, and rising bills by catching problems early and fixing them precisely. The sections that follow explain why professional detection matters, compare the most effective techniques, describe video inspection capabilities, list the specialized tools we use, match common concealed leak types to detection strategies, and flag the homeowner signs that mean it’s time to call a pro.
Why Is Professional Leak Detection Essential for Hidden Water Leaks?
Calling a professional matters because trained technicians bring the right instruments and a step-by-step process to find concealed leaks quickly—usually without tearing out walls or slabs. Leak detection works by measuring physical clues—acoustic noise, temperature differences, pressure loss, or escaping tracer gas—that point to the leak even when nothing is visible. The main advantage is targeted, non-invasive localization: we isolate the problem and plan repairs that limit structural disruption and cleanup. Left unchecked, slow leaks weaken materials, invite mold, and increase costs, so professional detection translates subtle signals into clear repair actions. Below we outline the main risks of undetected leaks to explain why prompt, expert attention pays off.
Hidden leaks create three priority risks: health issues from mold and mildew, structural damage from prolonged moisture, and financial loss from wasted water and growing repair needs. Moisture behind finishes feeds microbial growth that harms indoor air quality and can trigger respiratory problems. Saturated framing and finishes rot or corrode, weakening structural components. Financially, continuous leaks drive up utility bills and stack repair costs when damage spreads under floors or into slabs. Early, non-destructive detection is almost always cheaper than waiting and doing broad demolition and replacement. With those risks in mind, the next section shows how pros structure detection workflows to limit damage and expense.
Technicians reduce damage and costs by following a clear workflow: detect, pinpoint, then plan a repair that keeps intrusion to a minimum. We start with non-invasive scans—acoustic listening or thermal imaging—to narrow suspect areas, then verify with moisture meters or a camera before cutting or excavating. That focused approach shrinks repair areas, speeds scheduling, and creates documentation for insurance or contractor estimates. Fast response and coordinated repair planning also shorten downtime and limit secondary problems, which is why early professional intervention beats delayed, exploratory demolition. Now we’ll walk through the specific detection techniques used in the field.
Brightwater Plumbing of Orlando offers local homeowners and property managers professional leak detection services suited to Central Florida homes. As a family-owned company located at 751 Business Park Blvd, Suite 101, Winter Garden, FL 34787, we combine non-destructive methods with quick response to keep disruption low during detection and repair. If you suspect a hidden leak, call Brightwater Plumbing of Orlando at (407) 307-1625 for a prompt, precise assessment and a documented plan of action.
What Are the Most Effective Techniques for Locating Concealed Water Leaks?
Effective leak detection turns physical clues into exact locations using specialized sensors and trained diagnostic steps. Technicians mix methods based on the leak’s type, accessibility, and urgency to balance accuracy with minimal invasiveness. Acoustic detection listens for escaping pressurized water, thermal imaging shows temperature anomalies, video pipe inspection gives internal visual confirmation, and tracer gas finds tiny leaks that other tools miss. Each method has trade-offs in sensitivity, speed, and best use cases, so crews typically follow a sequence—acoustic scan → thermal check → camera confirmation—to close the case. The table below summarizes common uses, accuracy, invasiveness, and typical timeframes.
That comparison shows why technicians choose methods based on the leak’s pressure, access, and suspected location, and why combining techniques improves certainty. Next we’ll look at acoustic detection, a common first step for many concealed leaks.
How Does Acoustic Leak Detection Work to Find Hidden Leaks?

Acoustic leak detection finds pressurized leaks by amplifying and analyzing the sound water makes when it escapes a pipe. Technicians use ground microphones and listening equipment to map the loudest signals. The process depends on filtering out background noise, spotting frequency patterns that match flowing water, and moving sensors to triangulate the source. Acoustic work is especially effective under concrete slabs and behind finishes because sound travels through those structures, letting us locate a repair spot without cutting. In very noisy environments or with barely perceptible low-flow leaks, acoustic results are best paired with thermal imaging or tracer gas to confirm the exact break.
Typical acoustic workflow starts with isolating the system and checking pressure, then methodically scanning and triangulating to limit the repair area. We often corroborate acoustic findings with moisture meter readings so sounds aren’t mistaken for unrelated structural noise. Because the method is fast and non-destructive, it’s usually the first diagnostic tool for slab and in-wall investigations. From acoustic detection, we move to thermal imaging when heat or moisture contrasts offer a clearer picture.
When Is Thermal Imaging Leak Detection Most Useful?
Thermal imaging detects concealed leaks by showing surface temperature differences caused by escaping hot water or moisture-cooling effects. Infrared cameras work best when there’s thermal contrast—like leaking hot-water lines or moisture that changes a surface’s temperature—and they let technicians scan large areas quickly to highlight suspect zones. Factors such as sunlight, HVAC drafts, and ambient temperature can affect readings, so professionals verify thermal anomalies with moisture meters or a camera before cutting into finishes. Cold-water or very slow leaks may not produce a clear thermal signal, in which case acoustic or tracer gas tools are used for confirmation.
Thermal scans are a low-impact first pass that narrows the search area and reduces exploratory demolition. When a thermal scan shows a suspicious pattern, we follow up with pin or pinless moisture meters to measure saturation and decide whether a camera inspection or a targeted opening is needed. Combining thermal data with moisture readings helps plan repairs that preserve finishes and keep costs down.
How Does Video Pipe Inspection Help Identify Concealed Pipe Leaks?
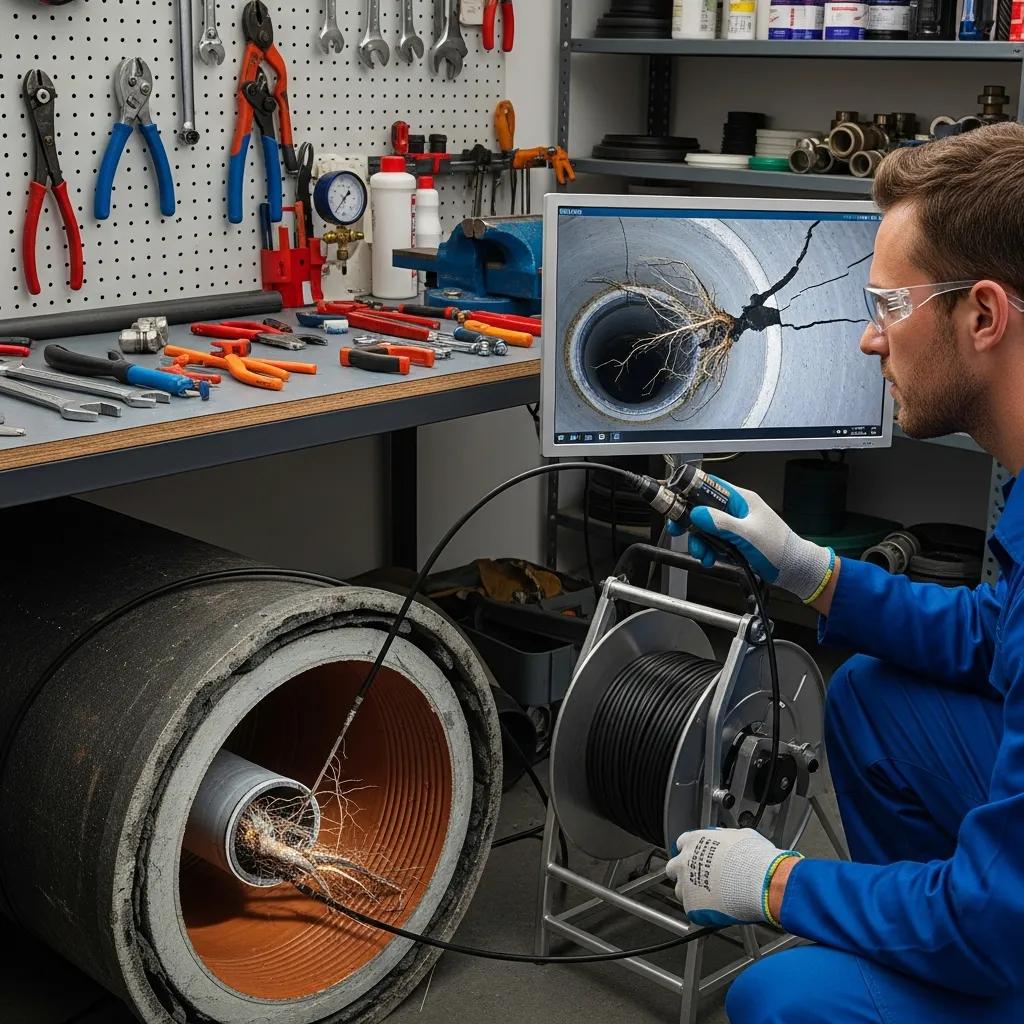
Video pipe inspection uses a flexible camera probe to look inside sewer, drain, and pressurized lines so technicians can see cracks, root intrusion, offsets, and other defects that sensors only hint at. The system provides direct visual evidence: onboard lights and a steerable camera capture footage that technicians annotate with distance markers and defect notes for repair planning. Video inspection backs up acoustic and thermal findings by confirming internal pipe conditions and is especially useful for sewer lines where internal corrosion or blockages are often the real issue. Below we explain what cameras reveal and how technicians interpret those findings.
What Can Sewer Cameras Reveal About Pipe Conditions?
Sewer cameras show a wide range of internal conditions—cracks, root intrusion, scale, joint offsets, partial collapses, and foreign-object blockages—which directly inform repair versus replacement decisions. Footage is timestamped and distance-marked so we can give exact repair locations and document pre-repair conditions for insurance or contractor estimates. Video also reveals pipe material and failure patterns, helping determine whether trenchless lining or a dig-and-replace approach is best. That visual record reduces guesswork and allows targeted interventions that avoid unnecessary excavation.
Technicians interpret camera footage in the context of flow behavior and past problems to recommend the least invasive fix. Recorded video also serves as a post-repair baseline. With clear visuals, homeowners and managers can make informed choices about rehabilitation versus full replacement, which often saves money and disruption.
How Does Video Inspection Detect Cracks, Corrosion, and Blockages?
Video inspection spots cracks and corrosion by visible texture and contrast changes inside the pipe, and blockages show up as grease, roots, or debris disrupting the camera’s view and altering flow. Camera features—steerable heads, bright integrated lighting, and distance encoding—let technicians zoom in on defects, estimate severity, and mark exact repair spots. Footage is turned into annotated reports with still images and time codes to support transparent repair quotes and insurance claims. Because inspection is minimally invasive and highly diagnostic, it often confirms the problem after acoustic or thermal scans have narrowed the search.
Reading footage takes experience: trained technicians separate cosmetic discoloration from true structural damage and include recommended next steps and confidence levels in reports based on observed conditions and pipe material. Video inspection has become a core tool in modern leak detection workflows. Next we’ll look at the specialized tools that make this work possible.
What Specialized Tools Do Professionals Use for Leak Detection?
Professionals rely on tools that translate physical clues into precise locations: common items include ground microphones, acoustic sensors, infrared thermal cameras, pin and pinless moisture meters, pressure gauges, tracer gas kits, and sewer inspection cameras. Each tool measures a different signal—sound, temperature, moisture content, pressure, gas escape, or visual defects—and technicians combine outputs to raise diagnostic confidence. Tool choice depends on the suspected leak type and site conditions; for example, ground microphones are ideal for slab leaks while tracer gas is useful for complex, low-flow systems. Brightwater Plumbing of Orlando maintains advanced equipment across these categories to support thorough, non-destructive diagnosis. The table below summarizes what each primary tool measures and how it indicates a leak.
Keep in mind: combining tools improves accuracy because it confirms anomalies across multiple physical signals and lowers the chance of unnecessary excavation.
That breakdown explains why technicians usually start with non-destructive sensors and only move to confirmatory tests like camera inspection or tracer gas when needed. The H3 subsections below go deeper into moisture meters and tracer gas work.
How Do Moisture Meters Measure Hidden Water Damage?
Moisture meters come in pin and pinless types. Pin meters measure electrical resistance between probes inserted into a material, while pinless meters use electromagnetic signals to estimate moisture without penetration. For drywall, wood framing, and concrete, higher readings show saturation and help technicians map the extent of moisture and prioritize testing or drying. Pin meters give point-specific numeric values that are useful for comparisons; pinless meters speed up surface scans for mapping. Since material makeup and salts affect readings, pros always interpret meter results alongside thermal images and visual checks to avoid false positives and plan remediation correctly.
Moisture mapping guides repair and drying decisions by showing whether moisture is localized, spreading, or chronic. When meters flag hotspots, technicians commonly follow with a camera or selective openings to confirm a pipe failure and limit repair size.
When Is Tracer Gas Detection Applied for Elusive Leaks?
Tracer gas detection is chosen for extremely small, slow, or hard-to-reach leaks where acoustic and thermal methods don’t give a clear location. The process injects an inert, easily detectable gas into a closed pipe while external sensors search for where it escapes. Tracer gas is sensitive enough to find micro-cracks in buried lines or joints under landscaping. Because safety protocols and controlled conditions are required, trained technicians handle tracer gas testing and follow industry standards. The method can be more time-consuming and requires access for injection, so we use it when other diagnostics can’t localize the leak or when pinpoint certainty is needed before excavation.
When tracer gas finds a leak, it usually narrows excavation to a small area and enables targeted repairs. For especially stubborn cases, tracer gas provides the final confirmation that avoids needless digging elsewhere.
What Are Common Types of Concealed Leaks and How Are They Detected?
Common concealed leak types include slab leaks, underground service line leaks, in-wall or in-ceiling leaks, and sewer-line defects. Each presents unique challenges and works best with certain detection combinations. Matching leak type to detection approach cuts time on site and limits unnecessary access work: slab leaks typically need acoustic and thermal scans plus pressure testing; in-wall leaks use thermal imaging and moisture mapping with targeted openings; and underground service-line leaks may require ground microphones or tracer gas plus directional locating. The table below pairs leak types with primary detection methods and explains the main challenge for each.
Efficient detection comes from sequencing methods logically so you narrow the problem before taking invasive steps.
Using a combined-method workflow increases certainty and narrows repair scope compared with relying on a single technique. The H3 subsections below dive into slab and underground/wall leak details and local considerations.
How Are Slab Leaks Detected and Why Are They a Foundation Threat?
Slab leaks come from damaged water lines under concrete slabs and are serious because ongoing moisture can erode supporting soil, cause settlement, and lead to costly structural repairs. Early detection is crucial. We usually start with acoustic scans to find pressurized flow sounds under the slab, add thermal imaging to spot warm areas from hot-water leaks, and use pressure testing to isolate the problem. Once we’ve localized the leak, technicians use minimally invasive probing or a small slab cut-and-patch at the confirmed spot to reduce the area of concrete removal. In Orlando’s sandy soils and slab-on-grade homes, prompt attention is especially important since soil movement and moisture can accelerate settlement; precise detection keeps excavation and repair costs down.
Because slab repairs are disruptive, combining acoustic and thermal evidence with moisture mapping before cutting concrete helps preserve finishes and speed repairs. The ability to limit work to a small area is what makes professional detection the cost-effective choice for slab issues.
How Do Professionals Locate Underground and Wall Leaks?
Underground leaks are located using ground microphones, tracer gas, and directional locators that convert a detected signal into a precise surface position for excavation. Wall-cavity leaks are mapped with thermal imaging and moisture meters to find wetting patterns behind finishes. Non-invasive approaches prioritize protecting landscaping and interior finishes: technicians scan the surface to narrow the search, then use locating tools to mark a precise dig or access point. If non-destructive methods don’t provide conclusive results, selective excavation or targeted cutting may be necessary, but modern workflows aim to keep the footprint small through layered diagnostics. Knowing these decision points helps homeowners see why a staged approach saves time and money.
Technicians also adjust for soil type and access constraints—for example, sandy Central Florida soils transmit sound differently than dense clay, so sensitivity settings or tracer gas may be preferred for deeper or attenuated signals. That local know-how is one reason experienced technicians make detection faster and more accurate.
What Are the Signs of Hidden Water Leaks That Indicate Professional Detection Is Needed?
Hidden leaks often show up indirectly through water-usage or environmental clues that homeowners or building managers can monitor. Spotting these signals early should prompt a professional inspection to prevent escalation. Common indicators include unexplained spikes in water bills, persistent musty odors or visible mold, warm spots on floors from hot-water leaks, new cracks or settlement in slabs, and the sound of running water when fixtures are off. The checklist below turns these signs into clear triggers for a professional inspection instead of prolonged DIY searching.
- High or unexplained water bills: A sudden jump without a change in use.
- Mold, mildew, or musty odors: Especially in hidden cavities or under flooring.
- Persistent damp spots or peeling paint: Localized finish failure that won’t dry.
- Audible running water when fixtures are off: A sign of active internal flow.
- Warm spots on the floor or wall: Often from hot-water lines leaking under slabs or behind finishes.
These clues point to active or chronic moisture problems that require the diagnostic tools professionals bring. If you notice one or more of these signs, following a structured detection sequence reduces unnecessary disruption and targets repairs efficiently. The next section shows quick verification steps homeowners can do and when to call in a pro.
How Can High Water Bills and Mold Indicate Concealed Leaks?
High water bills often mean hidden leaks because continuous, undetected flow raises usage without any visible fixture problems. A simple homeowner test is to note the meter, avoid all water use, and check the meter again after an hour—if it moves, you likely have a leak. Mold and recurring mildew signal chronic moisture that may come from slow leaks inside walls, under floors, or beneath slabs; untreated mold is a health concern and can stain and degrade materials. If your quick meter check shows continuous flow or you see mold, it’s time for professional leak detection to find the source and limit remediation.
After these homeowner checks, professionals will use non-destructive methods to pinpoint the issue and avoid unnecessary cutting. Prompt, accurate diagnosis stops small problems from becoming major structural or health issues.
What Visible and Invisible Warning Signs Should Homeowners Watch For?
Visible warning signs include water stains, bubbling paint, warped flooring, or unexplained puddles, while invisible signs include the sound of running water, sudden humidity spikes, or electrical trips caused by moisture. Homeowners can run simple checks—look under sinks, monitor the water meter, and listen for unusual sounds—and stay alert after heavy rain or other events that saturate soil around foundations. If multiple signs appear or problems return after surface fixes, professional detection is the next step to prevent hidden damage from getting worse. Recognizing both visible and invisible cues lets you act early and limit invasive repairs.
When warning signs persist, professionals combine your observations with sensor data to build a clear diagnostic picture that minimizes unnecessary demolition and speeds repairs, protecting both your property and health.
Brightwater Plumbing of Orlando offers on-demand leak detection and can document findings for repair planning. Call (407) 307-1625 to schedule a prompt diagnostic visit that focuses on non-destructive localization and clear next steps.
Frequently Asked Questions
What are the long-term effects of undetected water leaks?
Undetected leaks can cause serious long-term damage: structural weakening, mold growth, and higher utility bills. Over time, persistent moisture weakens wood, drywall, and other materials, creating costly repairs and possible safety issues. Mold and mildew thrive in damp areas and can negatively affect indoor air quality and health—especially for people with allergies or respiratory conditions. Continuous leaks also mean ongoing water waste and rising bills. Early detection and repair protect your home and your wallet.
How can homeowners prevent hidden leaks?
Prevent hidden leaks by keeping up with basic maintenance: check visible plumbing regularly, maintain appliances, insulate vulnerable pipes, and watch your water bill for spikes. Simple actions—inspecting under sinks, looking for damp spots, and scheduling routine plumbing checks—catch problems early. Installing leak-detection devices can also give you fast alerts so you can act before damage grows.
What should I do if I suspect a hidden leak?
If you suspect a hidden leak, start with a quick water-meter test: note the meter, don’t use water for an hour, then check it again. Look for visible signs like stains or mold. If you see evidence or the meter shows continuous flow, call a professional leak detection service. Trained technicians use specialized tools to locate leaks accurately without unnecessary damage. Acting quickly can prevent more extensive repairs and higher costs later.
Are there DIY methods for detecting water leaks?
There are a few DIY checks that can help: the water-meter test for continuous flow, inspecting visible plumbing for dampness, and keeping an eye out for new stains or mold. Dropping food coloring into a toilet tank can reveal a leaking flapper if the color shows up in the bowl. But for precise location—especially under slabs or in walls—professional detection is the best choice to avoid misdiagnosis and unnecessary damage.
How often should I have my plumbing inspected for leaks?
We recommend having a plumbing inspection at least once a year, especially for older homes or properties with known plumbing issues. Regular checks help catch problems early before they become expensive. If you notice signs like higher bills, damp spots, or recurring mold, schedule an inspection right away. Seasonal changes and extreme weather can also affect plumbing, so consider checks before and after storms or temperature swings.
What are the costs associated with professional leak detection services?
Costs vary depending on job complexity, methods used, and leak location. As a general range, homeowners can expect around $200 to $500 for a thorough leak-detection visit. More complex cases that need video inspection or tracer gas testing may cost more. While detection has an upfront cost, it usually saves money by avoiding broad demolition and limiting repair scope.
Conclusion
Professional leak detection finds concealed water leaks quickly and accurately, keeping damage and repair costs to a minimum. By using focused techniques like acoustic sensing, thermal imaging, and video inspection, we help homeowners catch problems early and choose the least disruptive repair. If you suspect a leak, call for a professional assessment that prioritizes precision and efficiency. Contact Brightwater Plumbing of Orlando to protect your home from costly water damage.
Get a Free Quote!
Terms and Conditions
Request a Quote
Terms and Conditions
Request a Quote
Terms and Conditions